
Crocheting a granny square is one of the most classic and beginner-friendly projects in the world of crochet. Whether you want to create cozy blankets, stylish tote bags, or home décor pieces, the granny square is the perfect starting point.
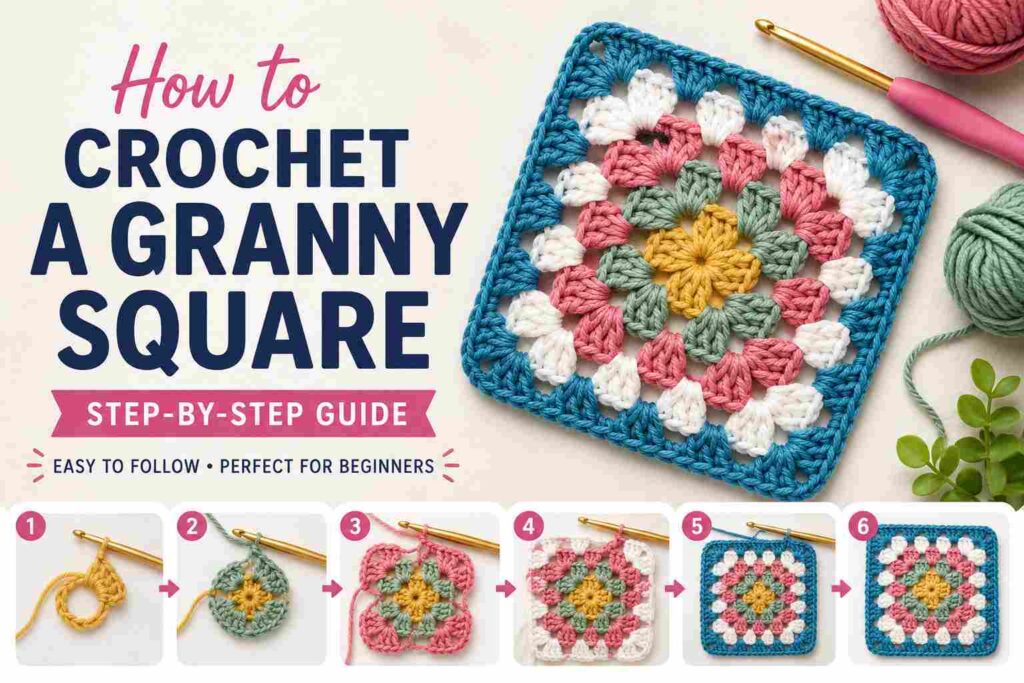
The beauty of this small square lies in its simplicity. With just a few basic stitches repeated in rounds, you can create something timeless, customizable, and endlessly creative.
In this complete guide, you’ll learn how to crochet a granny square step by step, plus several easy patterns you can start using immediately once you understand the basics.
What Is a Granny Square?
A granny square is a small crochet motif worked in a circular pattern from the center outward, forming a square shape. Each round builds on the previous one using clusters of stitches separated by chain spaces.
Traditionally, granny squares are made with:
- Multiple colors for a patchwork look
- Double crochet stitches as the foundation
- Repeated rounds that expand evenly
They are widely used in crochet projects because they are modular, meaning you can join many squares together to create larger designs.
Why Granny Squares Are Perfect for Beginners
If you’re just starting your crochet journey, granny squares are one of the best things you can learn. Here’s why:
- They use only basic stitches
- They are repetitive and easy to memorize
- They work up quickly, giving fast results
- Mistakes are easy to fix
- They allow endless creativity with color and design
Once you learn this simple square, you unlock the ability to create hundreds of different crochet projects.
Materials You’ll Need
Before you begin, gather the following supplies:
- Medium-weight yarn (worsted weight is ideal for beginners)
- Crochet hook (4.0mm–5.5mm depending on yarn thickness)
- Scissors
- Yarn needle for weaving ends
- Stitch markers (optional but helpful for beginners)
💡 Pro Tip: Choose light-colored yarn when learning so you can clearly see each stitch.
Basic Crochet Stitches You Need to Know
To successfully complete a granny square, you only need three fundamental stitches:
Chain Stitch (ch)
This is the foundation of most crochet projects. It creates the base loops.
Slip Stitch (sl st)
Used to join rounds together seamlessly.
Double Crochet (dc)
This is the main stitch used in granny squares. It creates height and structure.
Once you’re comfortable with these stitches, you’re ready to begin.
🧶 Step-by-Step: Classic Granny Square Tutorial
This is the foundation pattern that all variations are based on.
Step 1: Create the Center Ring
You can start in two ways:
Option 1: Chain Method
- Chain 4
- Join with a slip stitch to form a ring
Option 2: Magic Ring (recommended)
- Wrap yarn into a loop
- Pull yarn through to create adjustable ring
The magic ring creates a tighter, more polished center.
Step 2: Round 1 – The First Cluster
This round forms the center of your square.
- Chain 3 (counts as first double crochet)
- Work 2 double crochets into the ring
- Chain 2
Repeat the following 3 more times:
- 3 double crochets
- Chain 2
You should now have 4 groups of 3 double crochets separated by chain-2 spaces.
Join the round with a slip stitch into the top of the starting chain.
Step 3: Round 2 – Forming the Square Shape
This is where the circle begins turning into a square.
- Slip stitch into the nearest chain-2 space
- Chain 3
- Work 2 double crochets into the same space
- Chain 2
- Work 3 double crochets again into the same space
This creates your first corner.
Now move to the next space:
- Work 3 double crochets in each side space
At each corner space, repeat:
- 3 dc, chain 2, 3 dc
Join with a slip stitch.
Step 4: Round 3 and Beyond – Expanding the Square
Continue building your square using the same structure:
Corners:
- 3 double crochets
- Chain 2
- 3 double crochets
Sides:
- 3 double crochets in each space between corners
Each new round increases the size evenly.
You can continue for:
- 3–5 rounds for small motifs
- 6–10+ rounds for blankets or large projects
Step 5: Finishing Your Granny Square
Once you’ve reached your desired size:
- Cut yarn, leaving a tail
- Pull through loop to secure
- Use a yarn needle to weave in loose ends
- Block your square for a clean, flat shape
Blocking helps even out edges and improves overall appearance.
🌸 Easy Granny Square Patterns You Can Try
Once you understand the basic structure, you can experiment with beautiful variations. These patterns are beginner-friendly and widely used in modern crochet designs.
🌼 1. Classic Solid Granny Square
This is the simplest variation of all.
Pattern Details:
- Uses only double crochet stitches
- No color changes
- Clean and uniform structure
How It Works:
The structure remains the same as the basic granny square, but you use a single color throughout all rounds.
Best For:
- Minimalist blankets
- Coasters
- Beginner practice squares
💡 Tip: Use neutral yarn like beige, cream, or grey for a modern aesthetic.
🎨 2. Traditional Multicolor Granny Square
This is the most iconic granny square style.
Pattern Details:
- Same stitch structure as classic square
- Change yarn color every round
- Creates a patchwork effect
Example Color Sequence:
- Round 1: Yellow
- Round 2: White
- Round 3: Blue
- Round 4: Pink
Best For:
- Retro blankets
- Tote bags
- Scarves
💡 Tip: Cut yarn neatly and weave ends after each color change to avoid clutter.
🌿 3. Lacy Granny Square (Airy Version)
This variation creates a softer and lighter texture.
Pattern Differences:
- Includes extra chain spaces along sides
- Slightly looser structure
- More breathable design
Best For:
- Summer blankets
- Shawls
- Lightweight throws
💡 Tip: Cotton yarn enhances drape and softness.
🌻 4. Sunburst Granny Square (Floral Style)
One of the most popular decorative granny square patterns.
Pattern Structure:
- Round 1: Flower-like circular center
- Round 2: Puff stitches or clusters
- Round 3–4: Square shaping rounds
Stitch Types Used:
- Puff stitches
- Cluster stitches
- Double crochet
Best For:
- Pillow covers
- Boho blankets
- Decorative wall hangings
💡 Tip: Warm tones like yellow, orange, and cream create a sunflower effect.
🧊 5. Modern Minimal Granny Square
A clean, Pinterest-style aesthetic design.
Pattern Style:
- Single-color or two-tone design
- Tight and structured stitches
- Minimal texture
Best For:
- Modern home décor
- Fashion accessories
- Neutral-toned blankets
💡 Tip: Sage green, charcoal, and off-white work beautifully.
🌈 6. Gradient Ombre Granny Square
This pattern creates a soft fading color effect.
How to Make It:
- Use gradient yarn OR
- Gradually shift shades each round
Best For:
- Artistic blankets
- Wall décor
- Statement crochet pieces
💡 Tip: Keep tension consistent to ensure smooth color transitions.
🧵 How to Join Granny Squares
Once you’ve made multiple squares, you can join them in several ways:
Slip Stitch Join
- Flat and strong
- Slight ridge effect
Whip Stitch Join
- Nearly invisible seam
- Neat finish
Join-as-You-Go
- No sewing required
- Very beginner-friendly
Crochet Join Method
- Adds decorative texture
- Visible design element
⚠️ Common Mistakes to Avoid
Even beginners can create perfect granny squares by avoiding these mistakes:
- Skipping corner chain spaces
- Incorrect stitch counts per round
- Pulling tension too tightly
- Forgetting to count stitches regularly
- Uneven edges due to rushed work
Consistency is more important than speed.
💡 Creative Uses for Granny Squares
Granny squares are incredibly versatile. Once you master them, you can create:
- Cozy blankets and throws
- Stylish tote bags
- Crochet cardigans and sweaters
- Pillow covers
- Table runners
- Wall hangings and décor
They are one of the most flexible building blocks in crochet design.
✨ Final Thoughts
Learning how to crochet a granny square is more than just a beginner craft—it’s the foundation of an entire creative skillset. Once you understand the structure, you can explore endless color combinations, textures, and pattern variations.
Start with one square today, and you’ll quickly find yourself building beautiful handmade projects with confidence and creativity.